Connect QuickBooks Online to send customers, invoices, recorded payments and selected invoice documents from Trucking365 TMS. This guide takes you through connecting your company, choosing accounting settings and sending your first invoice.
Connecting alone does not send your invoices. You choose which invoices to send after reviewing them. Changes made in QuickBooks Online do not automatically update invoices or payments in Trucking365 TMS.
Connect QuickBooks Online
Before you start
- Sign in to the Trucking365 TMS company you want to connect. Ask your company administrator for permission to view and connect QuickBooks Online, edit its accounting settings and send invoices. Customer editing and document downloads require their own permissions.
- Use a QuickBooks Online account that can authorize access to the intended QuickBooks company. United States and Canada companies are supported.
- In QuickBooks Online, enable Custom transaction numbers under Settings → Account and settings → Sales → Sales form content and save. This lets the integration use your Trucking365 TMS invoice numbers.
- Prepare the QuickBooks products/services for freight, extra charges and deductions, a payment deposit account and the payment methods you use. Your bookkeeper can help choose the right entries.
Enable the connection on Integrations
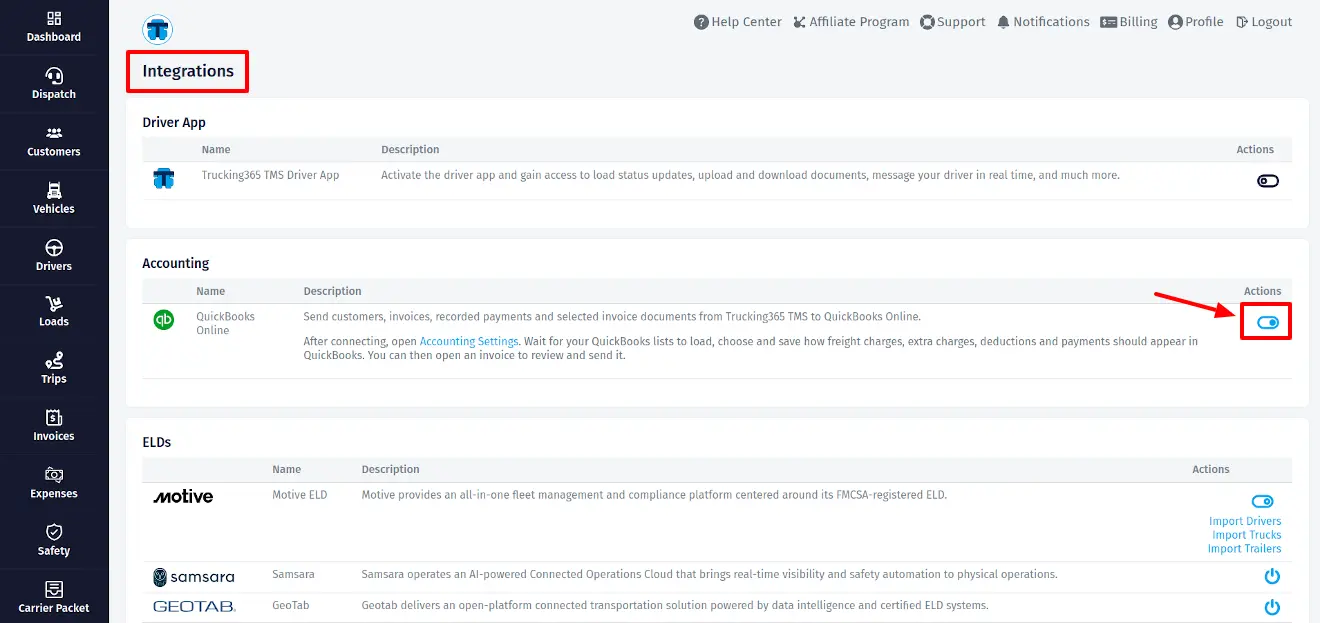
- Open Integrations page in Trucking365 TMS. Find Accounting → QuickBooks Online.
- In the Actions column, click the connection switch labelled Connect QuickBooks Online. You will be taken to Intuit.
- Sign in at Intuit if requested, choose the correct QuickBooks company and approve access. Keep the same Trucking365 TMS account signed in while authorizing.
- After returning to Trucking365 TMS, open the Accounting Settings link in the QuickBooks Online row. Confirm the connected company is the one you intended.
- Wait for the QuickBooks lists to load before configuring charges and payments. Use Refresh status to check progress.
If the QuickBooks Online row or switch is missing, ask your administrator to check whether the integration is enabled and your user has the required access. If you cancel authorization or receive an error, return to Integrations and try again after correcting the message; an incomplete authorization is not a reason to recreate existing invoices.
List loading and invoice sending run on the scheduled processing cycle, every 15 minutes. Other work or temporary QuickBooks Online errors can increase the wait. The status page can check progress automatically while you leave it open.
Disconnect and reconnect
To disconnect, return to Integrations, click the active QuickBooks Online switch and confirm. Disconnection stops new processing while preserving existing links and history. To reconnect, click Connect again and authorize the same QuickBooks company. Do not disconnect merely because a scheduled invoice is still waiting.
Previously sent records stay associated with their original QuickBooks company. If you need to change companies, review Connection details in Accounting Settings and ask your administrator or support to guide the change; old records are not automatically moved to the new company.
Configure Accounting Settings
Open Accounting Settings page from the QuickBooks Online row on Integrations or from the settings navigation after connecting. Use the QuickBooks Online Settings section. The example screenshots show a test company; use your own company's lists and accounting choices.
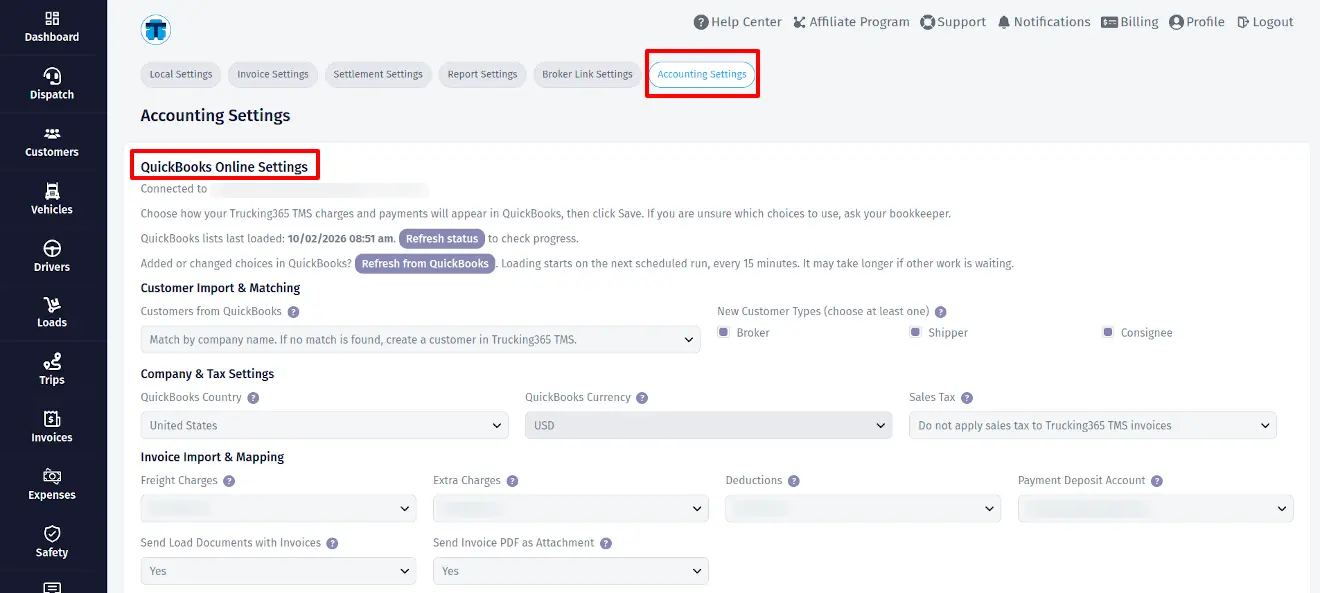
Load the choices before saving
Refresh from QuickBooks requests updated lists, including products/services, accounts, payment methods, customers and currencies where applicable. It does not send invoices. Refresh status checks progress; it does not start a new QuickBooks Online download or invoice send.
After first connection, wait until the products/services, accounts and payment methods are ready. If Multicurrency is enabled, wait for currencies too. Save remains unavailable while the required setup lists are incomplete. You do not need to wait for the customer list to finish to save the basic accounting settings. During a later refresh, previous complete lists can remain available while replacements load. If loading fails, read the message, correct the issue and request another Refresh from QuickBooks.
Choose settings in this order
- Check the connected company, QuickBooks Country and QuickBooks Currency.
- Choose how to import and match customers.
- Select the products/services for freight, extra charges and deductions.
- Choose the deposit account and match each payment method you use.
- Choose whether to include load documents and the invoice PDF.
- Click Save. If you changed customer import choices, request Refresh from QuickBooks after saving.
Company & Tax Settings
- QuickBooks Country: choose the country of the connected QuickBooks company. The default comes from your Trucking365 TMS company profile. If the selected country and connected company do not agree, correct the setting or connection before sending.
- QuickBooks Currency: when QuickBooks Multicurrency is off, the field displays the company's home currency and cannot be changed here. It must match your Trucking365 TMS company currency. When Multicurrency is on, select the same currency code as Trucking365 TMS. The QuickBooks customer must use that currency. Choose a compatible bank account or Undeposited Funds for payments. Amounts in Trucking365 TMS are not converted. If the selected currency differs from the QuickBooks home currency, exchange rates are obtained for invoice/payment dates when sending; updating an invoice without changing its date preserves its accepted exchange rate.
- Sales Tax: keep Do not apply sales tax to Trucking365 TMS invoices. Applying QuickBooks Online sales tax to these invoices is currently unavailable; the alternative is disabled. QuickBooks Online may still use sales tax for other transactions. If an invoice requires sales tax, consult your bookkeeper or support before using this integration for it.
Customer Import & Matching
Customers from QuickBooks controls what happens when the customer list is refreshed:
- Do not match or create customers in Trucking365 TMS: load the QuickBooks customer list without creating or automatically linking Trucking365 TMS customers. This is the default; you can match customers manually.
- Do not match. Create customers in Trucking365 TMS: create a customer for each active, unlinked QuickBooks customer. An existing Trucking365 TMS customer with the same name is not automatically matched, so this choice can create another customer with that name.
- Match by company name. If no match is found, create a customer in Trucking365 TMS: match a unique active customer with the same company name, or create one if none exists. Ambiguous names or customers already linked elsewhere need manual review.
For either option that creates customers, select at least one New Customer Type: Broker, Shipper or Consignee. These types apply only to newly created customers; existing types and matches stay unchanged. Review imported customers and complete missing contact/address details before using them.
Click Save, then Refresh from QuickBooks to apply the chosen rule on the next customer-list update. To match manually, open Customers page, click the company name and find QuickBooks Customer after Notes. Choose the corresponding customer and save. Use Load more customers if needed. One QuickBooks customer can be linked to only one Trucking365 TMS customer in the connection. No match clears the match; a later refresh may match it again under your import rule.
Invoice Import & Mapping
These settings choose how invoices sent from Trucking365 TMS appear in QuickBooks Online; they do not import QuickBooks invoices into Trucking365 TMS.
- Freight Charges: select the QuickBooks product/service for the main freight charge. Its QuickBooks setup determines how the income is recorded.
- Extra Charges: select the product/service for additional customer invoice charges, such as detention. These lines increase the invoice total.
- Deductions: select the product/service for customer invoice deductions. They are sent as negative lines and reduce the invoice total; these are not driver settlement deductions.
- Payment Deposit Account: choose a bank account or Undeposited Funds where QuickBooks records received payments. This choice records payments; it does not move money.
- Send Load Documents with Invoices: default No. Choose Yes to include supported active POD/BOL documents for the invoice's load. PDF, JPEG and PNG files up to 10 MB each are supported, with up to 100 load documents per invoice. Rate Confirmation and internal documents are excluded. Previously synchronized documents remain tracked; removing one from Trucking365 TMS removes its managed attachment on the next invoice send.
- Send Invoice PDF as Attachment: default No. Choose Yes to attach the same invoice PDF you download from Trucking365 TMS. Later invoice or related-detail changes replace that managed PDF on the next send. Choosing No removes an invoice PDF previously attached by the integration on the next send. This setting is separate from load documents.
Payment Method Mapping and Save
For each Payment Method: [name] field, select the QuickBooks payment method that corresponds to how you record receipts in Trucking365 TMS. Match every method used by the invoice's payments. If a required choice is missing, create or correct it in QuickBooks Online and use Refresh from QuickBooks here.
Click Save and wait for the green Record has been saved confirmation. Saving settings does not send invoices or automatically resend earlier ones. Open the relevant invoice, preview it and request a send when you are ready.
Send Invoices and Payments
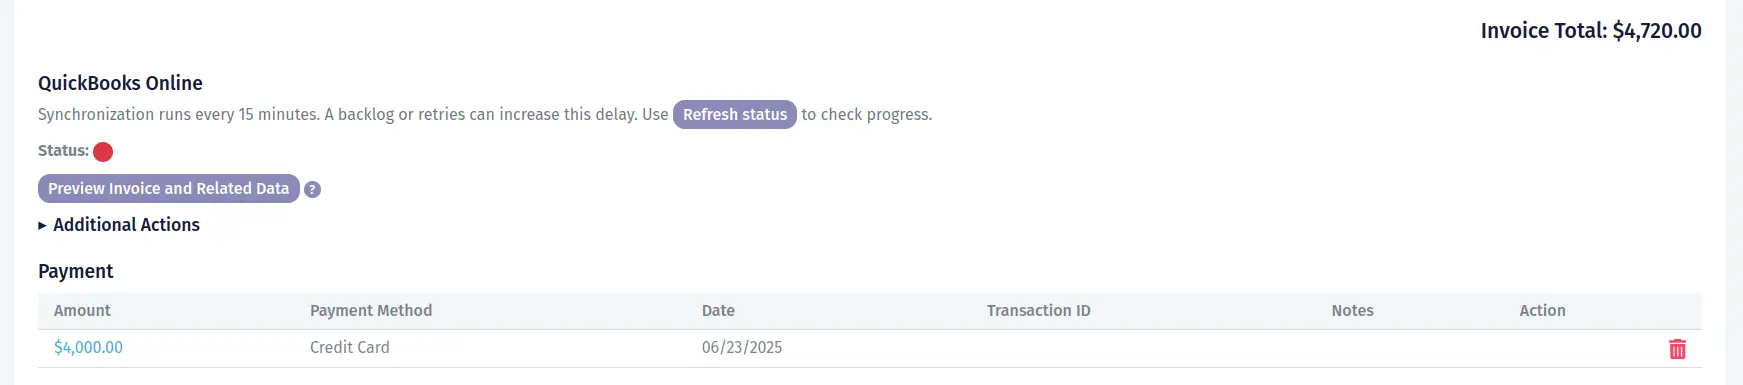
Prepare the invoice and customer
- Open Invoices page and click the invoice number. Create and save an invoice first if necessary; see Creating an Invoice.
- Review the saved invoice number, date, customer, freight, additions, deductions and total. Inactive and canceled invoices cannot be sent using the normal Send action.
- On the Invoice page, find QuickBooks Online immediately below Invoice Total. If it is missing, check your connection and permissions.
- If the invoice customer is not linked, match an existing customer through the Customers form described above. Alternatively, click Create a new QuickBooks Online customer? and confirm to request creation of a new customer. Use this only when there is no existing customer to match. Wait for processing and use Refresh status before continuing.
Record received payments in Trucking365 TMS
If money has already been received, record the payment against this invoice in Trucking365 TMS before sending; see Adding an Invoice Payment. Check each payment's amount, date and payment method. Only active positive payments are sent, and the combined payments must not exceed the invoice total. Up to 100 payments per invoice are supported. Unpaid, partially paid and fully paid invoices can be synchronized.
You do not need a separate QuickBooks payment-send button. The invoice send includes its recorded payments and links them to the corresponding QuickBooks Online invoice. It records receipts already entered in Trucking365 TMS; it does not charge the customer or initiate a bank transfer.
Preview, then send
- Click Preview Invoice and Related Data. Preview does not send anything.
- Check the country, currency, sales-tax choice, Trucking365 TMS total and expected QuickBooks Online total. Confirm the payment count/total and which documents will be included. Fix any warning before sending.
- Click Send Invoice to QuickBooks in the preview. This requests synchronization of the current invoice, its active payments and enabled supported attachments.
- Wait for the next scheduled processing cycle. Use Refresh status or leave the page open while the status is yellow. Processing may take longer when other work is waiting or QuickBooks Online temporarily cannot complete a request.
- Confirm the indicator turns green and review the invoice and payments in QuickBooks Online. If the indicator is red, read the warning and correct the named issue before previewing and sending again.
Sending documents requires permission to download both invoices and load documents. If Send is unavailable, ask your administrator to check synchronization and document permissions and ensure the preview belongs to the latest saved invoice data.
Understand the status indicator
- Green: the current invoice, its payments and included documents have been checked in QuickBooks Online and match the expected Trucking365 TMS data.
- Yellow: sending or verification is waiting, running or being retried. QuickBooks Online may already have accepted an update while Trucking365 TMS is checking it.
- Red: the invoice has not been sent, its data changed or a problem needs attention. Review the warning, then preview and send the corrected data.
Hover over the dot or focus it with the keyboard to read its explanation. Refresh status only reads progress; it does not send the invoice again. Additional Actions → Check QuickBooks Online requests a separate scheduled check for changes made in QuickBooks Online.
After changing invoices, payments or documents
Save your changes in Trucking365 TMS, then use Preview Invoice and Related Data → Send Invoice to QuickBooks again. New payments are added, changed managed payments are updated, and previously sent payments removed from Trucking365 TMS are also removed from QuickBooks Online. Supported document changes are applied during the next send. These actions can change accounting records already sent, so review edits and removals with your bookkeeper.
Sending the same unchanged invoice again is designed to reuse the integration's existing records rather than duplicate them. A send that started before a later Trucking365 TMS edit does not confirm those newer changes; preview and send again after saving. Changes made directly in QuickBooks Online do not update Trucking365 TMS and may be corrected to the Trucking365 TMS values on a later send.
If a payment has been included in a QuickBooks deposit or another accounting operation prevents an update, resolve the warning with your bookkeeper. If a response is uncertain, the integration checks for an existing result before trying again. Do not manually create a second invoice or payment to bypass an error; ask support when the result cannot be confirmed.
For a canceled Trucking365 TMS invoice already linked to QuickBooks Online, the separate Additional Actions → Void in QuickBooks action may be available. Review its confirmation carefully; canceling locally is not the normal invoice-send workflow.
This integration does not automatically synchronize expenses, fuel, maintenance, driver settlements, payroll, bills, factoring accounting, IFTA, refunds/credits or all historical invoices. Use it for the supported customer invoices and payments you explicitly choose to send.