Send company email from your own address
Custom SMTP lets Trucking365 TMS send your company's business emails through your email provider, using a sender address and name you choose. Customers can recognize your company when they receive an invoice, and drivers can recognize the sender of their trip details. One shared configuration applies to authorized users in your company.
When enabled, Custom SMTP is used for company-initiated invoice emails, trip details to drivers, carrier packets and load tracking-link emails. Existing message contents, recipients and attachments stay the same. Existing company reply addresses are preserved where those emails already set them; the sender address alone does not change every message's reply address.
When Custom SMTP is off or has never been configured, your company keeps the existing Trucking365 TMS email delivery method. Authentication, password reset, billing and support messages continue using the platform's email service even when Custom SMTP is enabled. If an enabled Custom SMTP send fails, Trucking365 TMS reports an error; it does not retry that business email through the default sender.
Configure Custom SMTP in Email Settings
Open the correct page
- Sign in to your company's Trucking365 TMS account.
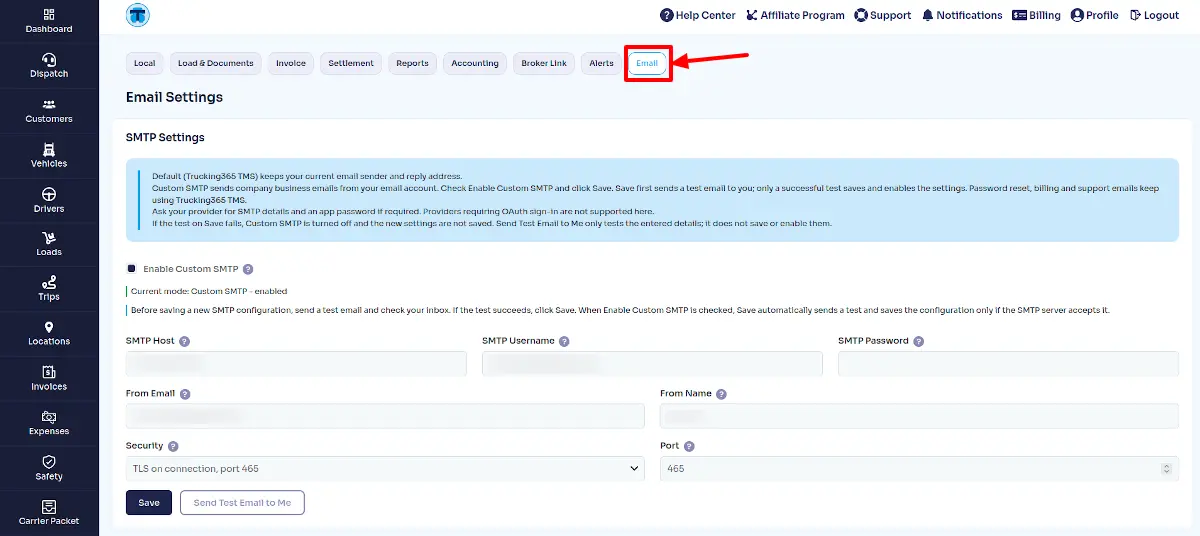
- Click Settings in the left sidebar, then click Email in the top settings bar. The page heading is Email Settings; the form is called SMTP Settings.
- Review Current mode. Default (Trucking365 TMS) means your custom server is not being used. Custom SMTP - enabled means saved Custom SMTP settings are active.
If Email is missing or the form stays read-only after loading, ask your administrator to check your SMTP Settings permissions. View access allows inspection; manage access allows editing, testing and saving. Changes apply to your company, not just your own login. Coordinate with other authorized users before replacing a shared configuration.
Collect your provider's settings and fill the fields
On Settings → Email, complete the following fields in SMTP Settings. Ask your email provider or account administrator for the outgoing SMTP details. An incoming IMAP/POP server, webmail URL or your company's website is not the SMTP host.
| Field | What to enter |
|---|---|
| Enable Custom SMTP | Check this to request activation when you click Save. Save tests the entered configuration first. Uncheck and Save to return to the default delivery method. |
| SMTP Host | Your provider's public outgoing server hostname, for example smtp.gmail.com. Enter the hostname only, without https://, a path or a port. Local/private servers are not supported. |
| SMTP Username | The account name required by your provider, often the full email address. Include the domain when your provider requires it. |
| SMTP Password | The SMTP password or provider-generated app password. A new configuration requires a password. To keep an already stored password, leave this field blank; enter a new value only to replace it. Stored passwords are never displayed. Do not paste passwords into support messages or screenshots. |
| From Email | The address recipients should see as the sender. It must be approved for sending by the SMTP account/provider. Start with the same address as the SMTP Username unless your provider authorizes another sender. |
| From Name | Your company or dispatch name, such as Example Transport Dispatch. This is the display name beside the sender address. |
| Security | Select TLS (STARTTLS), port 587, or TLS on connection, port 465, according to your provider. Selecting Security updates Port automatically. |
| Port | Use 587 with STARTTLS or 465 with TLS on connection. Other ports and unencrypted SMTP are not supported. |
Fields show validation errors below their controls. Correct them before trying again. This feature supports password-based SMTP, including provider app passwords. If your provider allows only OAuth, ask your administrator for a supported SMTP service instead. For a company domain, ask your provider to configure its sender verification and SPF/DKIM/DMARC requirements.
Send a test, then save and enable
- On Settings → Email → SMTP Settings, finish entering your connection and sender details.
- Click Send Test Email to Me. The test uses the fields currently shown, including unsaved changes. It goes to the email address of your signed-in Trucking365 TMS user, not automatically to From Email. The action reports a result without saving or enabling the configuration.
- Open that recipient's inbox and check spam/junk if necessary. A successful test response means the SMTP server accepted the message; it does not guarantee inbox delivery. The test message contains no customer documents and needs no reply or forwarding.
- Return to Settings → Email. Check Enable Custom SMTP and click Save. Save sends another test before saving and activating the configuration, even if you already tested manually. Wait for the save confirmation and verify Current mode.
If you skip the separate test and click Save with Enable Custom SMTP checked, Trucking365 TMS still tests first and saves only after SMTP acceptance. If that SMTP test fails, an error appears, Enable Custom SMTP is unchecked, and Custom SMTP is turned off. The entered replacement settings are not saved; previously stored connection details are retained. Correct the fields, check Enable Custom SMTP again and retry. A failed standalone test does not switch your saved mode.
Test attempts are limited to 10 per minute per user, shared between Send Test Email to Me and Save with Enable Custom SMTP checked. Failed attempts count. If you reach the limit, wait before another test. Saving with Enable Custom SMTP unchecked sends no test and remains available even after the test limit is reached.
Change settings or return to Default
To change the sender or provider, return through Settings → Email, edit the fields, test and Save. Leave SMTP Password blank to keep the stored secret, or enter its replacement. If another authorized user saves first, reload the page and review the current company settings before retrying; do not assume your older draft has been saved.
To stop using Custom SMTP, open Settings → Email, uncheck Enable Custom SMTP and click Save. The mode changes to Default without sending a test; stored SMTP details remain available for later use. Do not clear required fields just to disable it. To enable it again, check Enable Custom SMTP and Save; a successful test is required again.
If testing fails, review Host, Username, Password, From Email and the Security/Port pair on this same page. Confirm that your provider permits SMTP authentication and the chosen sender. If the server accepted a test but it is missing from the inbox, check spam and provider delivery information before repeatedly resending.
Example: use a Gmail account
Use this example if your Google account permits app passwords. Trucking365 TMS does not provide Sign in with Google for Custom SMTP. Google account policies and sending restrictions still apply.
Get an app password from Google
- Open your Google Account and select the Gmail account you want to send from.
- Click Security & sign-in. Under How you sign in to Google, open 2-Step Verification and follow Google's setup instructions if it is not enabled.
- Open Google's App passwords page. Sign in again if asked. Follow the prompts to generate an app password for Trucking365 TMS.
- Copy the generated 16-character app password into SMTP Password on Trucking365 TMS → Settings → Email. Use this app password instead of your normal Google sign-in password.
If App passwords is unavailable, account policy, Advanced Protection or security-key-only verification may prevent it. For a managed Google Workspace account, ask its administrator. Do not disable account protection to force access. Changing your Google password revokes app passwords; generate a replacement and update SMTP Password when needed. See Google's app-password guidance and 2-Step Verification instructions.
Enter the Gmail example in Trucking365 TMS
In Settings → Email → SMTP Settings, use these values, replacing the example address and name with your own:
| Field | Example value |
|---|---|
| SMTP Host | smtp.gmail.com |
| SMTP Username | Your full Gmail address, for example yourcompany@gmail.com |
| SMTP Password | The Google app password you just generated; do not use the sample email address as a password. |
| From Email | The same Gmail address used for SMTP Username |
| From Name | Your company name, for example Example Transport Dispatch |
| Security | TLS (STARTTLS), port 587 |
| Port | 587; alternatively use TLS on connection with 465 as a matching pair |
Click Send Test Email to Me on this Email Settings page, check the inbox of your signed-in TMS user, then check Enable Custom SMTP and click Save. Save performs its own test. Verify Current mode shows Custom SMTP - enabled. These values use Gmail's outgoing server; Google Workspace administrators should confirm their organization's SMTP and sender policies. See Google's SMTP configuration guidance.