Connect your MyGeotab database to Trucking365 TMS to import drivers, trucks and trailers, send changes back to GeoTab, and retrieve truck locations. Start with the database settings, import your existing fleet, then use the GeoTab actions on the Drivers and Vehicles pages.
The instructions below refer to the left sidebar in Trucking365 TMS. If a page or action is missing, ask your company administrator to check your integration, driver and vehicle view/save permissions. Use credentials for the MyGeotab database that belongs to the company you are working in.
Create a Geotab Database
If your fleet already has a MyGeotab database, ask its administrator for access to that database rather than creating another one.
- Open the registration link in Geotab's Database setup guide. Under I'm a New Customer, click Continue. The demo option creates sample data, not your live fleet.
- On Primary Contact Information, enter your contact details and create a password. Follow the displayed password requirements, then click Continue.
- On Account Information, enter your organization's details and click Continue.
- On Database Setup, choose a database name and enter your jurisdiction details, then click Submit.
- Use the welcome email's login link to verify access. Keep the exact database name, username/email and password for the TMS connection. A database name is not the full website URL.
Your GeoTab administrator should provide an integration user with access to the fleet records you need and permission to read them. Sending changes also requires permission to create or update the relevant records. A database alone does not supply live GPS data; the fleet's devices must be set up and reporting.
Configure the Geotab Database Settings within Trucking365 TMS
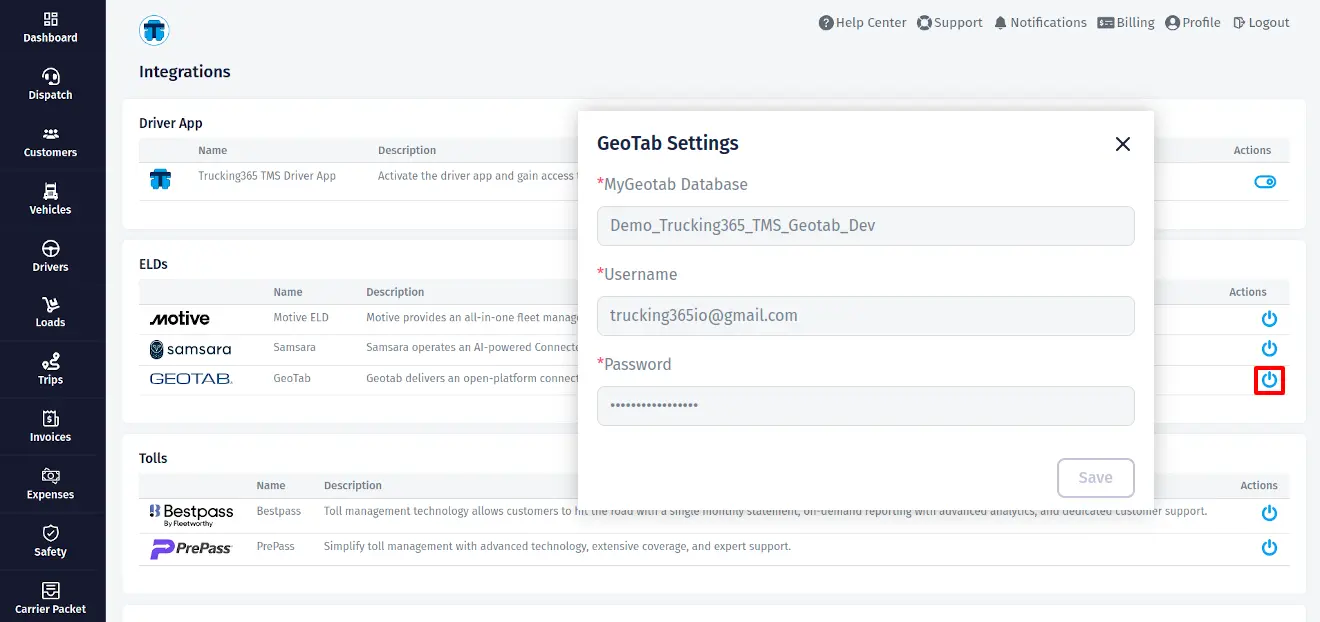
- In TMS, click Integrations in the left sidebar. In the ELDs table, find the GeoTab row.
- Click its power/connect icon, labeled Connect to Geotab. Hover over an icon to see its label.
- In the GeoTab Settings popup, complete the three fields described below and click Save.
- Wait for confirmation. The row now offers the import actions. If the connection is saved but disabled, click Enable Geotab in the same row.
- MyGeotab Database: the database name supplied by GeoTab or your administrator, for example
your_fleet. Do not paste a URL such ashttps://my.geotab.com/your_fleet. - Username: the MyGeotab login for the integration user, usually an email address.
- Password: that user's MyGeotab password. This is not a Trucking365 password.
To change credentials, return to Integrations → ELDs → GeoTab, click Update Settings, enter the database, username and password, and click Save. The password is not shown when you reopen the form, so enter it again. If the row is disabled, enable it to access Update Settings.
To pause the integration, click Disable Geotab in this row. Saved settings and existing record links are retained. Click Enable Geotab to reconnect with those settings. If connection fails, verify that the same credentials work in MyGeotab and that they grant access to the named database.
Import data from Geotab ELD to Trucking365 TMS
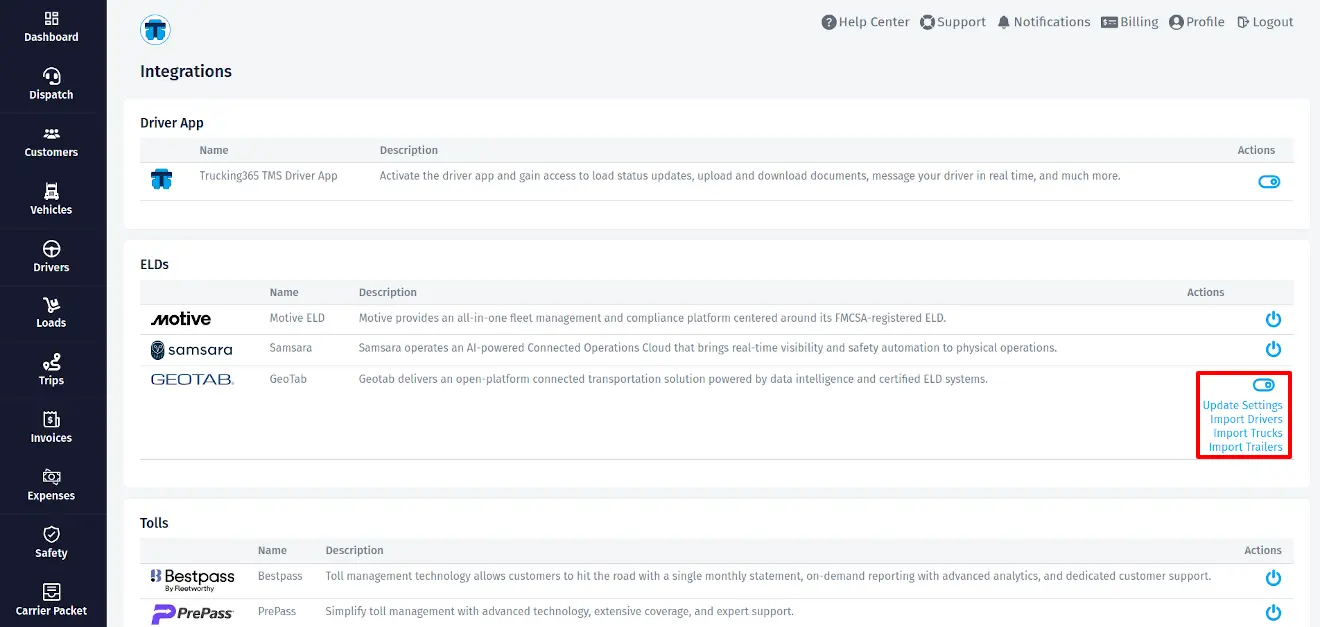
First connect and enable GeoTab on the Integrations page. Importing reads data from GeoTab into TMS; it does not send TMS changes back. Import existing GeoTab records before creating new ones through TMS so the two systems can establish their links.
Import drivers from Geotab ELD to Trucking365 TMS
- Open Integrations → ELDs → GeoTab and click Import Drivers.
- Wait for the result, then click Drivers in the left sidebar to review the imported drivers.
- Check names, contact details and license information before editing or exporting a driver.
TMS imports GeoTab users identified as drivers. Previously linked drivers are updated; for an unlinked record TMS attempts to match an existing driver before creating one. Repeating the import can update linked TMS records with GeoTab values. Review the result if a driver has incomplete or shared identifying information.
Import trucks from Geotab ELD to Trucking365 TMS
- Open Integrations → ELDs → GeoTab and click Import Trucks.
- After completion, open Vehicles in the left sidebar and review the truck rows.
The truck import requests GeoTab assets in the Vehicle group. TMS reuses an established link, otherwise attempts to match a truck by unit or VIN. An existing truck already linked to a different GeoTab asset is not reused for that asset.
Import trailers from Geotab ELD to Trucking365 TMS
- Open Integrations → ELDs → GeoTab and click Import Trailers.
- After completion, open Vehicles and review the trailer rows.
The trailer import requests assets in GeoTab's Trailer group and keeps trailer links separate from truck links. If an asset is absent or appears under the wrong type, ask your GeoTab administrator to check its asset group and the integration user's access before repeating the relevant import.
If an import reports partial completion, some records may already have been saved. Read the error, correct the affected source data or access settings, and repeat the relevant import. Review the TMS list rather than assuming that every source record was imported.
Update data from Trucking365 TMS to Geotab ELD
These actions send the selected TMS record to GeoTab. Editing a record in TMS alone does not export it. Keep GeoTab enabled on the Integrations page, save your edits in TMS, and then use the GeoTab icon on the record's row.
Update drivers from Trucking365 TMS to Geotab ELD
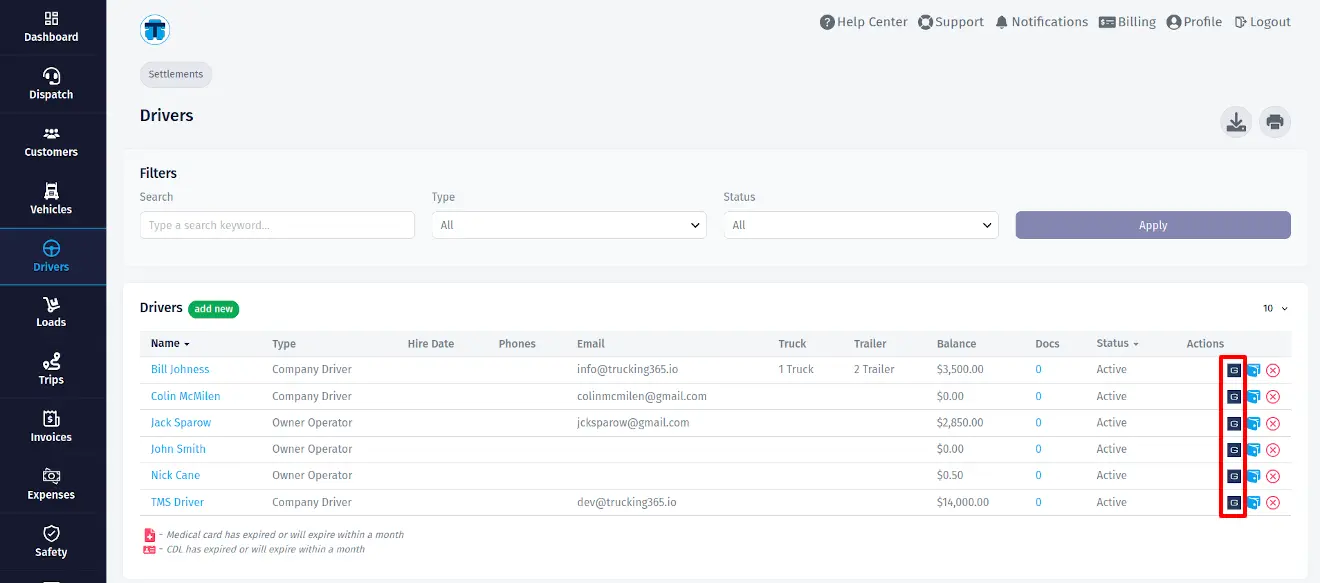
- Click Drivers in the left sidebar. Find the driver and open their edit form from the row. Check the name, email, phone, license number/state and notes, then click Save.
- Back on the Drivers list, click that driver's GeoTab icon, labeled Save to Geotab.
- Wait for the result. If a link already exists, TMS updates that GeoTab driver. If no link exists, it attempts to create a driver and establishes the link after success.
The driver's email is used as the GeoTab login. Without an email, TMS uses a lowercase slug made from first name, last name and TMS ID, for example clear-driver-13. This is a login, not a generated mailbox. For a newly created driver, TMS generates an initial password and requests a password change; it does not display that password. Ask your GeoTab administrator to arrange the driver's login access in MyGeotab.
Read any GeoTab error message and correct the driver's fields on Drivers, save the TMS record, then click Save to Geotab again. For example, GeoTab may require a phone in the form +1 2223334444, and a license number and license state must be supplied together. TMS does not reformat the phone or fill in a missing license number for you. Existing driver groups, keys and timezone are preserved during an update.
Update trucks & trailers from Trucking365 TMS to Geotab ELD
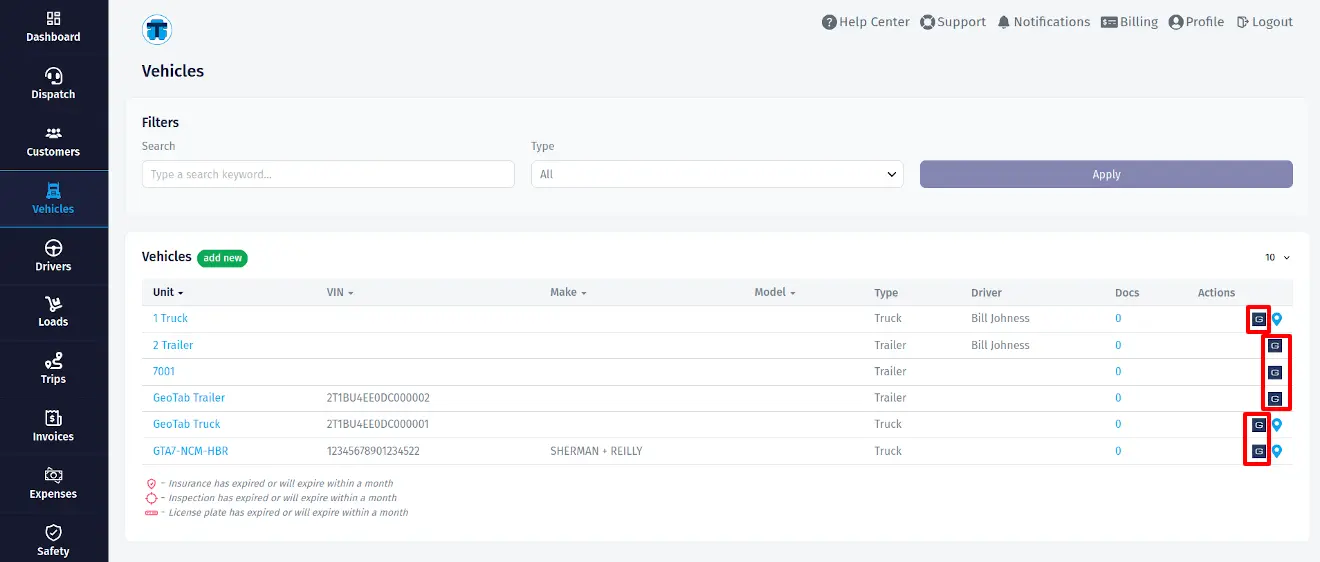
- Click Vehicles in the left sidebar. Find the truck or trailer, open its edit form from the row, correct its unit, VIN and license plate details, and click Save.
- Back on Vehicles, click the GeoTab icon in that row, labeled Save to Geotab.
- Already linked: the request is sent immediately to update the linked GeoTab asset.
- Not linked: a Save to GeoTab popup asks for a Serial number. Enter the actual GeoTab device serial number for this asset and click Save. Use the device's serial, not the VIN, plate or TMS unit number.
- If GeoTab rejects the number, read the message in the popup, correct the number and click Save again. The popup retains your entry. After success it closes and the asset is linked for subsequent updates.
This TMS creation flow requires a device serial number for both trucks and trailers. If the asset already exists in GeoTab, use Integrations → ELDs → GeoTab → Import Trucks or Import Trailers to establish the link first. If you do not have a valid serial, ask your GeoTab administrator or device provider how the asset should be provisioned; do not invent one. Updating a linked asset does not replace its existing serial number.
For other field errors, return to the asset's edit form on Vehicles, correct the reported field, click Save, then retry Save to Geotab. An access-denied error requires the GeoTab administrator to review the integration user's permissions.
Getting a vehicle's current location from Geotab
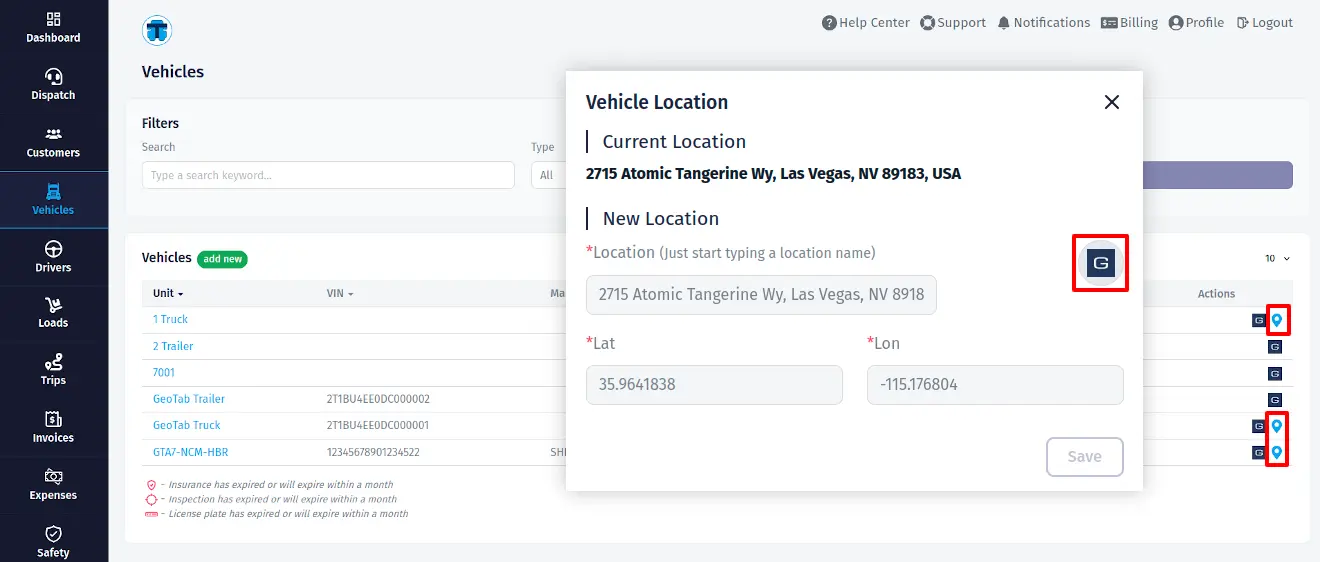
Location retrieval is available for linked trucks. On Integrations → ELDs → GeoTab, connect and enable the integration; use Import Trucks if the truck exists in GeoTab but has not yet been linked in TMS. GeoTab must have reported coordinates for the device. A trailer import or a newly created asset without GPS data does not provide a current truck location.
Manually retrieving a vehicle's current location from Geotab
- Open Vehicles from the left sidebar and find the truck.
- In its row, click the location icon labeled Current Location.
- In the Vehicle Location popup, click the GeoTab icon labeled Get Location from Geotab.
- Review the returned location and coordinates on the map. Click Save in the popup to save the displayed location in TMS.
The retrieval action fills the popup; it does not save a manual location until you click Save. GeoTab supplies its latest reported position, which may be old if the device is offline. If an address cannot be resolved, the location name can show the coordinates. If retrieval fails, read the error and check the link, integration settings and device reporting, or enter the location manually in this popup and click Save.
Automatically retrieving a vehicle's current location from Geotab
With GeoTab connected and enabled on Integrations → ELDs → GeoTab, TMS is scheduled to import truck locations every 30 minutes. You do not need to keep the Vehicles page open or click a separate automatic-location button. Only linked trucks in your company can receive these updates, and the server's scheduled jobs must be running.
To check the saved result, open Vehicles and click the truck's Current Location icon. Automatic imports save the reported coordinates and an address where available, or coordinate text if the address service is unavailable. They can also add location history for an active trip. If positions stop changing, check that GeoTab is enabled and the device is reporting; ask TMS support to check scheduled imports if manual retrieval works but automatic updates do not.